
How to self publish with Kindle Direct Publishing
by Miles Warren
April 11,2022
Here’s an exciting thought: you can publish your novel with Kindle Direct Publishing (KDP) from Amazon.com !
KDP allows anyone to upload their work on Amazon.com. Then, every time a purchase happens, books are made to order, manufactured at professional quality, and shipped within weeks… or less! We’re not exaggerating: with Amazon Prime, our full-length novel was printed shipped in just two days!
So, if you want to circumvent traditional publishing, are targeting a super-niche crowd, or simply want to try Amazon’s printing program, we’re here to help!

Tips and tricks for writing a novel in Google Docs
How to self publish with Kindle Direct Publishing
Step 1: Getting Started in KDP
Follow this link and follow the usual startup procedures. When that’s done…welcome to the website! It will look something like this:
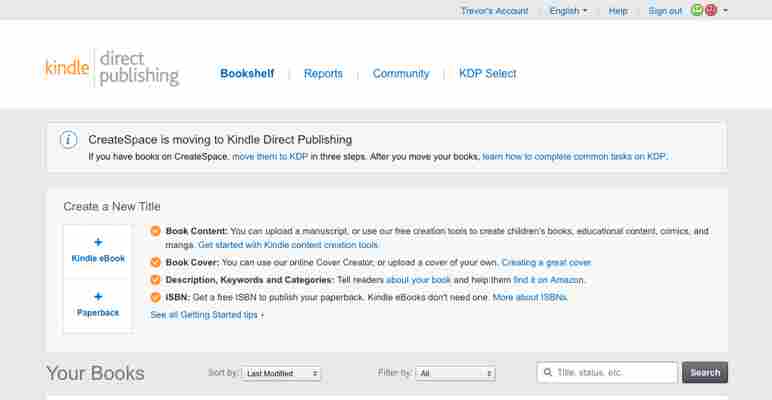
From this page, you can start creating new paperback novels (and eBooks), or check what projects have already been started in the “Your Books” section below.
Of course, since we’re creating a novel, head into the creator studio! If you want to create an eBook later, you’ll be able to use transfer paperback settings easily.
Here, we have the three main steps:
We’ll discuss how to complete each one. During this portion, work carefully but don’t stress too much: even if you submit the novel for review, most details can be altered after being accepted.
(And if a few copies are printed with errors? Who knows, they might be really valuable once you’re a popular novelist!)
Step 2: Paperback Details
These details go quickly! Anything that can’t be changed after initial publication will be marked with (*) hereon.
Step 3: Paperback Content
Here, we get to the real intricate stuff! You may need to use trial and error to get some parts right, but trust us: it’s worth it. This section brings the novel together, so we’ll take it slow.
1. Print ISBN. If you don’t have an International Standard Book Number, Amazon provides one for you!
2. Publication Date. Leave this blank if you’re printing for the first time, or put in the original date. Easy as that.
3. Print type* . You must choose between options for the Paper Type, Trim Size, Bleed Settings, and Paperback Cover Finish.
Paper type dictates what color the page will be: we went with classic black and white text on cream pages (white pages are available too), but a visual novel or comic book may need fully colored pages.
Trim size determines the book’s dimensions. Many novels use the classic 6×9 inch cut, but your novel might lend itself to a different size. If unsure, find some books and measure them.
Unless you have a good reason for the pages to run off the edges, hit “No Bleed”.
The cover finish determines if the cover will be shiny (Glossy) or not (Matte). We chose matte for our project because fingerprints show up more easily on glossy covers.
4. Manuscript: this is a biggie. To create the body of your book, Amazon takes your document and puts every page into their printer preview. The intro section appears like this:
PDF files work best because the images can be resized easily to your desired trim.
In contrast, the average Word document will need to be resized beforehand from 12.5 x 11-inch paper (the default setting) to fit Amazon’s specifications. This means you may have to alter your manuscript itself; a change in size can mess with such things as chapter spacing.
5. Book Cover: another biggie! You can use a full, ready-to-print PDF. However, most users will probably rely on the Amazon cover creator instead:
Opening up the cover creator will take a minute. At the end, you’ll see something like this:
Take it step by step! The first tab, “Choose Design”, allows you to find a good template. When you select one, it moves to”Style and Edit,” where the cover art, spine information, back description, author details, and more can be freely manipulated. Finally, “Preview” shows an overview of the work!
(As you can see, we chose the design that allowed our cover art to be featured on the front page.)
6. Book Preview . Finally, you get a chance to review your novel from start to finish!
Make sure the pages are set and the cover wraps appropriately. If KDP discovers a problem or you want to change a detail, head back and fix it before moving on. You’re almost there!
Step 4: Paperback Rights and Pricing
The steps in this area won’t take long at all.
What Comes Next?
First off, plan some kind of celebration! You’ve made a huge accomplishment that many will never experience. Have friends and family over, eat a nice meal, play some video games. Keep writing and reading!
Whenever you’re ready, we recommend ordering one of your own books: make sure the printing turned out well and enjoy holding the physical copy in your hands! It’s a good feeling.
Finally, consider finding ways to promote your novel. Local libraries often have days for community authors. Post on your social media platforms: you’ll be surprised how much support you’ll receive! Get creative, and the sky’s the limit!